Fermi-Swift GRB Data Analysis Workshop
November 8-12, 2010
Goddard Space Flight Center
Greenbelt, MD
Welcome | Agenda | Directions | Downloads | Links | Contacts
Swift BAT/XRT/UVOT
Software Requirement
A. HEASOFT (v 6.10)
To be able to use my xspec local model in the GRB prompt emission spectral analysis, installing HEASOFT from the source code is required.
1. Go to:
http://heasarc.gsfc.nasa.gov/docs/software/lheasoft/download.html
2. Check "Source code distribution" of STEP 1.
3. Check your appropriate platform.
3. In STEP2, check "Swift" for Mission-Specific Tools.
4. Click "Submit."
5. Save the download file (heasoft-6.10src.tar.gz) to your PC.
6. Follow the instruction to install HEASOFT from the source code.
http://heasarc.gsfc.nasa.gov/docs/software/lheasoft/install.html
Here is my installation note of HEASOFT 6.10 from the source code in my Mac (Mac OS X 10.6.4)
taka> mv ~/Downloads/heasoft-6.10src.tar.gz ~/heasoft/

taka> cd ~/heasoft/

taka> gtar zxvf heasoft-6.10src.tar.gz

taka> cd heasoft-6.10/BUILD_DIR/

taka> ./configure >& config.out

taka> make >& build.log

taka> make install >& install.log
7. Setup
Put following lines in your .cshrc (if you are csh) to setup HEASOFT (my example below). Note HEADAS environment depends on your PC or platform (see HEASOFT installation document for details).
setenv HEADAS /Volumes/Apps_and_Docs/takanori/heasoft/heasoft-6.9/i386-apple-darwin10.4.0

source $HEADAS/headas-init.csh
B. CALDB
You can find the instruction to install CALDB from:
http://heasarc.gsfc.nasa.gov/docs/heasarc/caldb/caldb_install.html
Here is my step by step instruction (what I did in my Mac).
1. Download the Swift caldb files (BAT, XRT, UVOT and Swift Common) from:
http://heasarc.gsfc.nasa.gov/docs/heasarc/caldb/swift/
Click "Retrieve TAR file" for each panel (BAT, XRT, UVOT and Swift Common). You should have four tar files.
taka> ls -1

goodfiles_swift_bat.tar.Z

goodfiles_swift_mis.tar.Z

goodfiles_swift_uvota.tar.Z

goodfiles_swift_xrt.tar.Z
2. Untar CALDB files
taka> gtar zxvf goodfiles_swift_bat.tar.Z

taka> gtar zxvf goodfiles_swift_mis.tar.Z

taka> gtar zxvf goodfiles_swift_uvota.tar.Z

taka> gtar zxvf goodfiles_swift_xrt.tar.Z
3. wget CALDB setup file (caldb_setup_files.tar.Z) and untar the file.
taka> wget http://heasarc.gsfc.nasa.gov/FTP/caldb/software/tools/caldb_setup_files.tar.Z

taka> gtar zxvf caldb_setup_files.tar.Z
4. Remove all tar files.
taka> rm *tar.Z
5. Setup CALDB enviroment
The directory where you untar swift CALDB files and the setup file is your CALDB directory. You need to setup CALDB environment to point this directory. In my case,
taka> pwd

taka> /Volumes/Apps_and_Docs/takanori/heasoft/caldb
So, my CALDB should point this directory. To avoid the confusion, you need to comment out the top line of ./software/tools/caldbinit.csh file (CALDB initialization file). Chance from
setenv CALDB /FTP/caldb
to
#setenv CALDB /FTP/caldb
(just add "#" mark at the front of the line)
And in your .cshrc, add following two lines.
setenv CALDB /Volumes/Apps_and_Docs/takanori/heasoft/caldb

source $CALDB/software/tools/caldbinit.csh
6. Check
Run caldbinfo command to check whether your are successfully install CALDB or not.
taka> caldbinfo INST SWIFT BAT

** caldbinfo 1.0.2

... Local CALDB appears to be set-up & accessible

** caldbinfo 1.0.2 completed successfully
If you see "ERROR" messages, you still have a problem in installing CALDB.
Check the error messages.
C. Xspec local model install and setup
1. Download the xspec local model source code from
2. Move the tar file to specific directory and untar it. In my case, I create a new directory called xspec_lmodel under ~/heasoft/ and put the file there.
taka> cd ~/heasoft

taka> mkdir xspec_lmodel

taka> cd xspec_lmodel

taka> mv ~/Downloads/ngrbep_xspec_lmodel.tar .

taka> gtar xvf ngrbep_xspec_lmodel.tar
3. run xspec
taka> xspec

XSPEC version: 12.6.0

Build Date/Time: Tue Sep 14 11:42:13 2010

XSPEC12>
4. run initpackage command. The first argument is the name of the local model package which you can call whatever you want (but you have to know this name when you load the local model when you using the local model). The 2nd argument is the model description file which should be lmodel.dat. The 3rd argument is the directory pass where you have the xspec local model which ~/heasoft/xspec_lmodel in my case.
XSPEC12> initpackage grbep lmodel.dat ~/heasoft/xspec_lmodel

...

Local model library has been built from model definition and code files in:

~/heasoft/xspec_lmodel
5. Load the local model package. In xspec, use lmod command to load the xspec local model package which you installed by initpackage command. The first argument is the package name. In the above example, it is "grbep." The 2nd argument is the directory where you installed the xspec local model. In the above example, it is ~/heasoft/xspec_lmodel.
XSPEC12> lmod grbep ~/heasoft/xspec_lmodel

Model package grbep successfully loaded.
When you see "Model package grbep successfully loaded." You are ready to use.
6. Check
Check whether you see "ngrbep" entry in xspec model list by typing "model ?" in xspec. You should see a new entry "ngrbep*" (star at the end) which is the local model.
XSPEC12>model ?
Additive Models:
apec        bapec       bbody       bbodyrad    bexrav      bexriv
bkn2pow     bknpower    bmc         bremss      bvapec      c6mekl
c6pmekl     c6pvmkl     c6vmekl     cemekl      cevmkl      cflow
compLS      compPS      compST      compTT      compbb      cutoffpl
disk        diskbb      diskir      diskline    diskm       disko
diskpbb     diskpn      equil       expdec      ezdiskbb    gaussian
gnei        grad        grbm        kerrbb      kerrd       kerrdisk
laor        laor2       lorentz     meka        mekal       mkcflow
nei         ngrbep*     npshock     nsa         nsagrav     nsatmos
nsmax       nteea       nthComp     pegpwrlw    pexrav      pexriv
plcabs      posm        powerlaw    pshock      raymond     redge
refsch      sedov       sirf        smaug       srcut       sresc
step        vapec       vbremss     vequil      vgnei       vmcflow
vmeka       vmekal      vnei        vnpshock    vpshock     vraymond
vsedov      zbbody      zbremss     zgauss      zpowerlw
Let's make sure the local model works. Let's use this model by typing "model ngrbep" in xspec. If you don't see any error message, you should be ready to go.
XSPEC12> model ngrbep

Input parameter value, delta, min, bot, top, and max values for ...
            -1       0.01        -10         -3          2          5
1:ngrbep:alpha>
            -2       0.01        -10         -5          2         10
2:ngrbep:beta>
           300         10        0.1        0.1       1000      10000
3:ngrbep:epeak>
           100      -0.01          0          0       1000       1000
4:ngrbep:enorm>
             1       0.01          0          0      1e+24      1e+24
5:ngrbep:norm>
========================================================================
Model ngrbep<1> Source No.: 1   Active/Off
Model Model Component  Parameter  Unit     Value
 par  comp
  1    1   ngrbep     alpha               -1.00000     +/-  0.0
  2    1   ngrbep     beta                -2.00000     +/-  0.0
  3    1   ngrbep     epeak      keV      300.000      +/-  0.0
  4    1   ngrbep     enorm      keV      100.000      frozen
  5    1   ngrbep     norm                1.00000      +/-  0.0
_______________________________________________________________________
D. ds9
http://hea-www.harvard.edu/RD/ds9/
E. WCSTools (specifically for UVOT data analysis)
http://tdc-www.harvard.edu/wcstools/
Data preparation
GRB samples for the workship: GRB 090510 and GRB 100906A
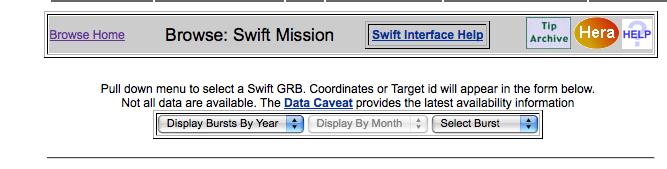
1. Go to Swift Browse interface
http://heasarc.gsfc.nasa.gov/cgi-bin/W3Browse/swift.pl
Note: for a GRB with less the 7 day old, the data are stored in the Swift SDC QL site (http://swift.gsfc.nasa.gov/cgi-bin/sdc/ql?)
2. From the top of scrolling bar (see below image), select the burst. For example, in the case of GRB 090510, it happened on May 10, 2009. Scroll "Display Bursts by Year" to 2009. Next, scroll "Display By Month" to May. Finally, scroll "Select Burst 2009 May" to GRB 090510. Then, you will see "Target id" field filled with number "351588" which is equivalent to the BAT trigger ID of this burst.
3. Click "Start Search" button.
4. Now you are in "Search Results" page. In case of GRB 090510, you will see two rows entry. They are 00351588000 and 00351588001 in obsid column. Those numbers are what we called "observation ID." For GRBs, it is composed:
00 (BAT trigger ID; 6 digits) (segment ID; 3 digits)
The last three digits, segment ID, will be started from 000, and be incremented whenever Swift does the followup observation of the burst.
For the BAT data, all the prompt emission data will be stored in segment 000. For the XRT and UVOT, we need all the segment data to look for the late time afterglow data.
5. Check box called "Select All" at the left side of the list. Then, scroll down the page and click "Retrieve" button.
6. It will open a new window in your browser. Just click the link looks like:
http://heasarc.gsfc.nasa.gov/FTP/retrieve/w3browse/w3browse-164452.tar
It will download the data (w3browse-164452.tar).
7. Final step is to untar the data.
taka>tar xvf w3browse-164452.tar
8. You should see directories which are labeled with obsid.
taka>ls

00351588000 00351588001

- Curator: J.D. Myers
- NASA Official: Elizabeth Hays
- Fermi FAQ, Comments, Feedback
- › Privacy Policy and Important Notices
- › Accessibility
- › Contact NASA
- › Page Last Updated: Tue, Nov 01, 2011