

Extract LAT Data
This thread shows how to extract LAT data from the FERMI Science Support Center (FSSC) archive and perform further selection cuts using the Fermi Science Tools.
Synopsis:
This thread leads you through extracting your LAT data files from the FSSC's databases. In order to analyze LAT data, you will need several LAT data products.
- An events file containing the recorded events that correspond to your source source of interest, as
well as the region surrounding that source. The size of this surrounding "radius-of-interest," or ROI,
that you choose will depend on the density and brightness of nearby sources, as well as the type of
analysis you are performing. There are two types of events files:
- Photon Data - contains all information necessary for science analysis
- Extended Data - contains all photon data, plus additional quantities produced by the Level 1 analysis
- A spacecraft file containing spacecraft position and orientation information at 30 second intervals. This file is required for LAT science analysis. The LAT data server will only generate a single spacecraft file, regardless of the size of the dataset.
A description of the contents of each file is available here.
Prerequisites
It is assumed that:
- The FERMI Science Tools software has been set up on your machine, if not it can be obtained from the FSSC web site.
Procedure
To select all photons within a circular region around the source:
- Go to the FSSC's web site data server
- In the section labeled 'Do you want to search around a position...?', enter the RA and Dec
separated by a comma.
- RA = 193.98
- Dec = -5.82

Notes:
- These coordinates are J2000 (i.e., make sure that J2000 is in the second box in this section).
- The Object Name and Coordinates fields accept (for the most part) the same input format as the HEASARC BROWSE tables.
- Note that if you choose to enter a source name rather than coordinates, the Object Name Resolver will retrieve the source coordinates for you. You will need to save these coordinates for subsequent use in several of the Science Tools. The source coordinates will be reported back to you when you retrieve the results of your query.

- Enter your radius of interest (ROI) in the Selection Radius field. Here we select a 20 degree ROI.

- To select all photons in this region from a particular time range, enter the start and stop times, separated by a comma, in the Observations Dates field. The time can be entered in multiple formats. The xTime utility is available should you need to convert your time to a different format. Here we select all events for our ROI for the first six months of the Fermi mission.
- Tstart = START
- Tstop = 255398400 s
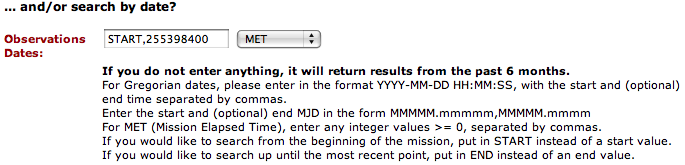
Note: In this case, the start time is the start of the full LAT dataset. (END can be used to designate the end of the dataset). The end time is in Mission Elapsed Time (MET), the number of seconds from a reference time; therefore the box to the right of the time should show MET. MJD or civil dates can also be used following the syntax conventions displayed. You cannot mix time conventions, but START and END can be used with any time format.
- To select the energy range enter the minimum and maximum energies separated by a comma. Here we select 100 MeV to 100 GeV, to match the energy range used in the first LAT catalog.

- Then you choose what data files to download. The default options are "Photon" and
"Spacecraft", as these are recommended for science. Extended data files are also available, and can replace the photon data in your analysis.

- Click on the Start Search button.
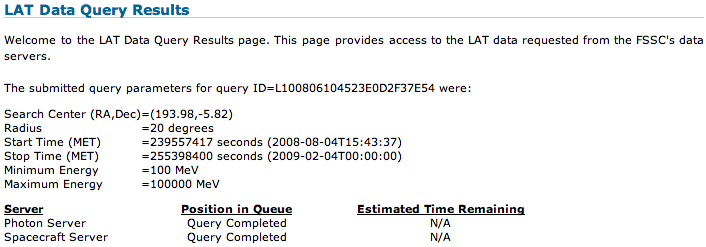
The 'Query Successfully Submitted' webpage will be displayed and provide an estimate of the time to complete the query, as well as a link to the results webpage.
When you go to this new webpage —'LAT Data Query Results' — you may be told that the query is not yet complete. Periodically, click on your browser's refresh button. When the query is complete, the Position in Queue will show as 'Query Completed' and the data files will list links to the files themselves.
- It is strongly suggested that you capture the information reported on the query page in a text file accompanying your data. While it can be retrieved through other means, having the information from your query easily accesible may ease certain portions of the analysis.
- Download the spacecraft (pointing and livetime history) file and events data file to your working directory. There may be multiple events files (_PH## or _EV##), but there should be only a single spacecraft (_SC##) file.

- Next, you should prepare your data for analysis by following the Data Preparation Tutorial
Last updated by: Elizabeth Ferrara 08/05/2010