
Evaluation of Option 3 Observing Strategy
Brief Description of the Observing Strategy
This strategy is similar to option 2, but shifts the Declination of the pointed target toward the orbit equator once per week. The shift results in a varying offset from the Galactic Center, but keeps the Galactic Center within the field of view. The sky uniformity on short timescales is significantly improved with respect to options 1 and 2.
Point at RA=261.4, with Declination corresponding to the orbit equator, updated once per week. Make the transition into a 50 deg rocking profile survey when the target is 10 deg from Earth occultation. Then commence slew back to target when target is exiting 10 deg from Earth occultation. EAA is set to 30 deg, so LAT boresight will track to within 30 deg of Earth limb and then hold steady until target reaches 10 deg to Earth limb. The spacecraft (FT2) files for the option 3 observing strategy and for a comparison 50 deg rocking profile can be found on the parent to this page.
Each spacecraft (FT2) file is for 56 days (just a bit longer than a precession period).
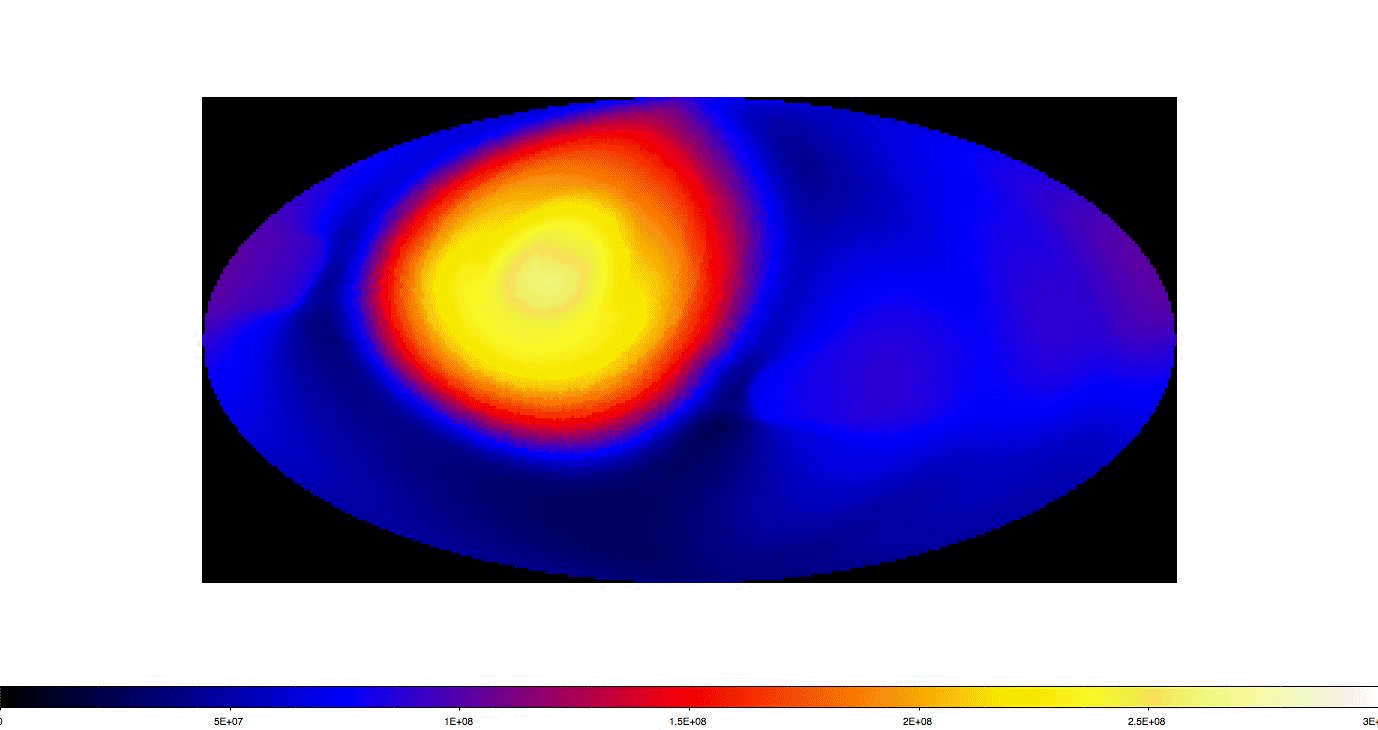
Here is an exposure map for option 3.
Here is a corresponding exposure map movie with 108 frames corresponding to 54 days.
Fraction of time that the Galactic Center is within 45 deg of LAT boresight
The galactic center is within 45 deg of the LAT boresight for 7.0 days in survey mode and for ?? days with option 3. This is a factor of 3.8 improvement for option 3 relative to survey mode. Note that this includes time in the SAA (we are not observing during the SAA interval). A zenith cut of 100 was applied.

The figure shows the distribution of galactic center theta for 56 days. Each entry corresponds to 30 seconds. Black is option 3, blue is survey mode. A zenith cut of 100 deg has been applied.
All Sky Exposure (integrated over 56 days)
Here are all sky exposure maps for option 3 and for survey mode. The exposure was divided by 4.6e9 cm^2 s, which is roughly the exposure at the Galactic center for the 50 deg survey mode case.
The exposure was calculated using gtltcube (zmax=100) and gtexpcube for P7V6Source response at 10 GeV. A 100 deg zenith cut has been applied. SAA intervals were excluded from the calculation.

For option 3 (left panel) there is a large region around the celestial equator with a factor of XX increase in exposure relative to 50 deg sky survey (right panel). The increase in exposure at the Galactic center relative to survey mode is roughly XX. The underexposure in the southern hemisphere is due to SAA outages.
This is a histogram of the pixels in the exposure maps for option 1 (blue), option 2 (red), and option 3 (black), so that they can more easily be compared. Option 3 has significantly improved exposure uniformity compared with option 2.

Observation Efficiency
Observations that bring the LAT FoV across the Earth lose some exposure due to blockage from the Earth/zenith cuts. Thus changing the observation strategy doesn't just redistribute exposure, it can also result in loss of exposure due to zenith cuts. One way to quantify the observation efficiency is to compare the mean exposure on the sky for option 3 and for survey mode (this is reported by gtexpcube). These are X.XXe9 cm^2 s for option 3 and 5.54e9 cm^2 s for survey. Thus the percentage loss in efficiency between option 3 and survey mode is X.X%.
Exposure as a Function of Time
Here is a movie of 54 days of option 3, where each frame is a one day integration. We get complete coverage of the sky each day.
Here is a movie (>50MB gif) of 54 days of option 3, where each frame is two orbits. There is a dayscale periodicity (likely related to SAA outages), that results in zero exposure in a small part of the sky every 7-8 frames. The next frame always has complete coverage (so we mostly cover the whole sky within 3 hours and always cover the entire sky every 6 hours).
Summary
The following metrics are calculated at 56 day interval, 10 GeV, P7V6SOURCE, zenith cut of 100 deg and exclude the SAA (unless otherwise noted).
| Option3 | Survey | option3/survey | |
|---|---|---|---|
| Fraction of time GC within 45 deg (includes SAA) | 26.9 days | 7.0 | 3.8 |
| Exposure (in units of GC exposure in survey mode) | 2.5 | 1 | 2.5 |
| Integrated exposure on entire sky | 2.14e14 | 2.21e14 | 0.965 |
Additional Considerations:
- Coverage of entire sky on all days and most 2 orbit intervals with option 3 (outages on one two orbit interval per day due to SAA).
- Increases EAA to 30 deg - will cause additional latency for some ARR (those close to the pole)
- Shorter continguous observations with option 3 relative to survey mode, as we are no longer keeping the continuous viewing zone near the orbit poles within the FoV for each orbit. This may make this observation worse for mid-duration transients
- There may be different systematics considerations for this observing profile relative to survey mode, as some parts of the sky might now accrue most of its exposure at large theta. This will need further study.

- Curator: J.D. Myers
- NASA Official: Elizabeth Hays
- Fermi FAQ, Comments, Feedback
- › Privacy Policy and Important Notices
- › Accessibility
- › Contact NASA
- › Page Last Updated: Mon, Jul 22, 2013