Generate Customized GBM Response File for Transient Events
Synopsis:
This thread shows how to generate a GBM response file for transient events. The GBM team automatically creates single response matrix files for all the observed gamma-ray bursts, valid for the spacecraft position and orientation at the time of the trigger. They can be found in the archive together with the data. For other transient events (such as solar flares) and for observations for which the response at trigger time is not appropriate (particularly episodes occurring after Automatic Repoint maneuvers), the user must use the tool gbmrspgen to create the response matrices, as explained below.
Since gbmrspgen requires a large library of calibration files to generate the response files for the GBM, the tool is not distributed within the standard release of the Fermi Science Tools and must be run within Hera, a data processing facility provided by the HEASARC for analyzing FITS format files over the internet.
Procedure
To generate the response matrix within Hera, the user needs to:
- Download fv;
- Create an account in Hera;
- Import the data into Hera;
- Run gbmrspgen.
A detailed description of each step is presented in the next section.
1. Download fv
fv is a small, completely self-contained software: it is an interactive FITS file editor that is typically distributed in the release of the Heasarc software (HEASoft), but the user can download and run the standalone version. fv also provides a portal into Hera data analysis service. The tar file containing the latest version of the software and the instructions to install it can be found here.
2. Create an account in Hera
First time users must create a Hera account to connect to the system. After installing fv, on UNIX system (including Mac OS-X), you start the standard Hera interface by typing fv -hera at the prompt of your terminal. For Windows PC, please follow the directions explained in the "Connecting to Hera" section of the standard Hera interface web page.
Launching Hera, three windows will appear on your screen: a web browser connected to the "Welcome to Hera" page, a small window containing a service message and the Heasarc Service Login window. If this is the first time you are using Hera, click on the "Create an account" button and insert all the required information. After submitting them, you should receive an email containing a link to activate your account. Once you click on the link, you will be able to submit your jobs after logging into Hera. Again use the Service Login window by typing your Hera user name and password information.
After you are able to connect to Hera, a new window like this will appear:
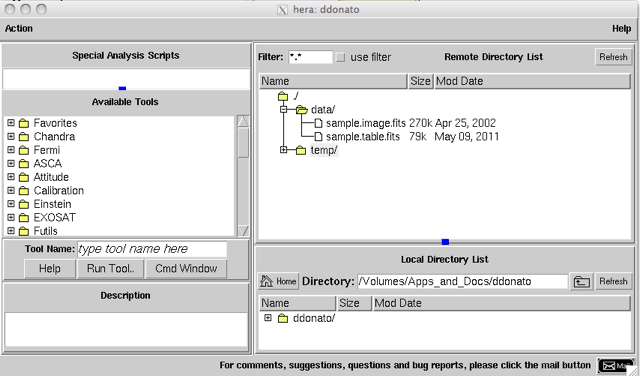
3. Import the data into Hera
The data of all transient events can be retrieved from the Fermi tables in the Heasarc archive. If the user is interested only in GRBs, the Fermi GBM Burst Catalog can be selected. For a more comprehensive data retrieval of all types of triggered events (namely impulsive emission from GRBs, soft gamma-ray repeaters, solar flares, generic transients, Galactic binaries, Terrestrial Gamma-ray Flashes, and triggers from local particles, accidental triggers, and triggered events with an uncertain classification), the user should query the Fermi GBM Trigger Catalog. You can use gbmrspgen to generate responses for all triggered events which can be localized: gamma-ray bursts, soft gamma-ray repeaters and other galactic transients, and solar flares.
To retrieve the data for a specific transient, you can either use the trigger name ("bnYYMMDDNNN"), the trigger time, or the range of times in which the transient occured. If you do not know those specific information, you can query the catalog by the trigger type (e.g., for the full list of solar flares you can type "SFL*").
Once the search is completed, select all the events you are interested into and go all the way down the page. In the "Data Product Retrieval" box, select the "GBM Trigger Products - Entire Directory" tab and then click the "Save to Hera" button. A new window will appear, where you have to enter your Hera user name and password. All the data selected will be copied in your Hera account.
If your search was relatively quick (a few minutes), than your Hera session, opened with fv, will still be active. Note: regardless of the stage of your job in the Hera session, if it remains inactive for more than a few minutes, it will automatically close. The transfer of data to your account should be very fast (almost instantaneous). Just click the "Refresh" button on the top right corner of the Hera window and your data will appear in the "triggers" directory in the "Remote Directory List" box (upper right panel of the Hera window). If you session expired, relaunch it by typing again fv -hera in your terminal.
4. Run gbmrspgen
The next step is to select the tool that has to be run, gbmrspgen in our case. You can either select it from the "Available Tools" box (center left panel) by expanding the "Fermi" directory, or by entering it in the "Tool Name" box. Before you hit the "Run Tool" button, make sure you select the data by expanding the directory of the trigger event until you see the list of all the files (the sequence to reach the data is "triggers -> 20XX -> bnYYMMDDNNN -> current").
Once the "Run Tool" button has been clicked, a new window will appear: in the "No parfile" box you should enter the additional options for running gbmrspgen, as explained in the help file (it can also be retrieved by clicking on "Help", just below the "Tool Name" box in the main Hera window). In most cases, the user should type "-N -M2" (see the help file for an explanation) to obtain single response matrices for the time of the GBM trigger, modeling both the direct flux from the source and the flux scattered from the Earth's atmosphere. The last step is to click the "Run" button.
After Hera has finished running, you can press the button "Refresh" and the response files (one for each spectral PHA data file contained in the "current" directory) will appear together with the files copied from the Heasarc archive. The new fits files have an extension "rsp" (single matrices) or "rsp2" (multiple matrices) and they can be easily spotted by the time of creation. Another way of displaying the new files is to close and re-open the "current" directory.
If you want to download the files (the data and the response) to perform a spectral analysis on your computer, you first expand the "Local Directory List" to select the final location of the files and then you can export them from the "Remote Directory List". To do that you have to right-click on the file's name. Once an icon that resembles a written page shows up, you can drag the file while keeping the right-click button pressed.
Last updated by: Davide Donato 08/03/2012